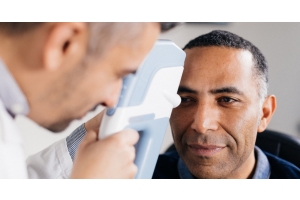
Any optometrist learning to carry out the retinoscopy procedure knows it can take plenty of patience and practice to master.
Our experts have provided this helpful beginner's guide to help you get to grips with the retinoscopy procedure.
What is retinoscopy?
Optometrists use a retinoscopy procedure to measure how well a patient can see objects at varying distances and determine what kind of vision correction is needed.
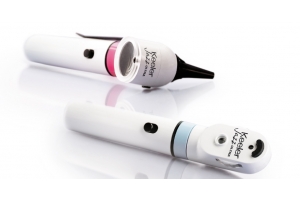
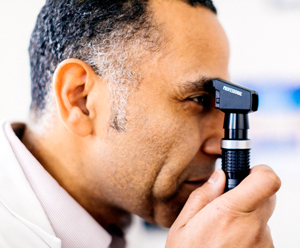
The test uses a small, handheld instrument called a retinoscope, which optometrists look through to examine a patient’s eyes.
It is quick and painless and does not require much cooperation from patients.
Discover more about commonly used optometry equipment in this simple guide
How does a retinoscopy procedure work?
The retinoscopy technique is used to obtain an objective measurement of the refractive error of a patient’s eyes.
A refractive error is when the eye does not bend the light coming into the eye properly as it passes through the cornea, the crystalline lens, and fluid media to come to a sharp, clear focus onto your retina. This can include astigmatism, farsightedness, nearsightedness, and the need for glasses.
Determining retinoscopy working distance
When conducting the retinoscopy procedure, get started by asking your patient to fixate on an object or a place in the distance. Alternatively, you can get the patient to relax by dilating their eyes with a cycloplegic agent.
You can start determining the appropriate retinoscopy working distance by sitting at arm’s length from the phoropter. Make sure to consider this when figuring your patient’s final spherical error.
To calculate the number of diopters needed, take the inverse of your working distance in metres. For instance, if your retinoscopy working distance is 50cm, subtract two diopters or 1/0.5m from the final spherical correction to account for this.
The retinoscopy procedure – step-by-step
Beginning on the right side, shine the retinoscopy streak into their eye and move the streak from side to side. You must decide whether the patient’s light reflex moves with their pupil or against. Make sure to look at the reflex in different meridians as you rotate the axis of the streak.
If the reflex has a consistent brightness and width all around, the patient doesn’t have astigmatism.
In contrast, if the reflex looks dimmer/brighter or thinner/thicker when alternating the axis of the streak, then the patient does have astigmatism, and you will need to correct it.
Adjusting the script and achieving neutrality
If the patient’s refractive error is spherical only, decide if you need to add minus or plus power. Use the pneumonic “SPAM” to remember:
-
-
-
- Same (‘with’ motion) requires
- Plus power
- Against motion requires
- Minus power
-
-
Then, use the spherical power dial on your phoropter to add the right amount of power until a bright red reflex light appears without any motion that fills the pupil. At this point, you have achieved neutrality.
Retinoscopy procedure for astigmatism
If your patient has astigmatism, you will notice the reflex moving obliquely as you move the streak from side to side. Continue to rotate the beam until it is parallel with the reflex motion. After neutralising the ‘with’ or ‘against’ movement, the secondary meridian should be 90 degrees away at the axis of the patient’s astigmatism.
Neutralise the ‘with’ or ‘against’ movement in the second meridian to find the cylindrical power. Repeat the retinoscopy procedure with the patient’s other eye. Make sure you subtract the retinoscopy working distance before writing the prescription.
Understanding how to create a prescription
Once you have successfully examined your patient’s eyes, the next step in a retinoscopy procedure is to understand the components of a glasses prescription. The first number represents the spherical power in diopters.
This number can represent the degrees of:
-
-
-
- Hyperopia – plus power caused by the extra convergence required to neutralise farsightedness
- Myopia – minus power because a diverging lens is necessary to neutralise nearsightedness
-
-
If astigmatism exists, the second and third figures will represent it.
The second number refers to the power in diopters of the cylinder. It’s important to understand that the cylindrical power can be represented in minus or plus cylinder form; lens transposition can convert one to the other.
The third number specifies the axis in which the cylinder is neutralised. If your patient needs bifocals, ‘ADD’ will be the extra spherical power.
Contact Keeler for high-quality optometry exam room equipment
If you’re looking for the best optometry exam room equipment, Keeler Ophthalmic Instruments will meet your needs and exceed your expectations. For more than 100 years, we’ve continually innovated to help eye care professionals deliver exceptional results.